|
PRODUCT MENU
|
| - |
WCCO
Belting |
| - |
Presswheels |
| - |
Kverneland
Hay Spikes |
| - |
Delmhorst
Mosture Meters |
| - |
Roller
Chains, Leaf
Chains & Baler Chains |
| - |
Sprockets,
Platewheels, Taper lock & Reverse Taper |
| - |
Bearings,
Housings & Seals |
| - |
Pulleys
& Belts |
| - |
Gerni
Pressure Cleaners |
| - |
Davey
Pumps |
| - |
Dolmar
Chainsaws |
| - |
Dunlite
Generators |
| - |
Jetstream
|
| - |
Tools
Hand & Air Operated |
| - |
Agparts
Motors & Pumps |
| - |
Fire
Equipment |
| - |
Onga |
| - |
Murray
Mowers |
| - |
Tractor
Parts & Accessories |
| - |
PTO
Driveshafts, Clutches, Universal Joints & Componants |
| - |
Harvest
Belting & Hay Equipment |
| - |
Air
Seeder Hoses, Secondary Heads & Components |
| - |
Ground
Engaging Tools |
| - |
Batteries,
Car, Truck, Tractor & Industrial |
| - |
Britax
Equipment |
| - |
Donaldson
Filtration |
| - |
Hydraulic,
Hoses, Fittings & Rams |
| - |
Transport
Chain & Load Binders |
| - |
Fuel
Pumps, Meters & Grease Guns |
| - |
Engines
& Generators |
| - |
Safety
Equipment |
| - |
Welding
Equipment |
| - |
Clutches |
| - |
Consumables |
| - |
Specials
|
|
| |
|
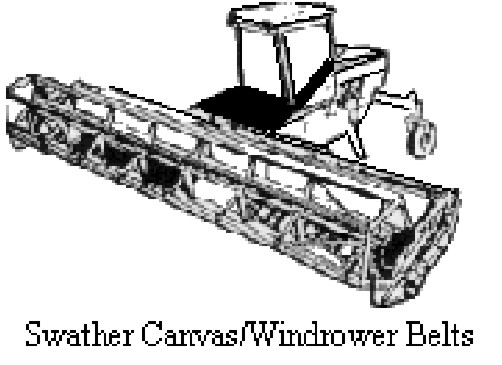
SWATHER
CANVAS
CONVEYOR
BELTS
BEAN
WINDROWER
BELTS
HARVESTING
TEETH
LACING
HARVEST
HEADER BELTS
BALER
BELTS
COMBINE PICKUP
BELTS
BALE THROWER
BELTS

|

WCCO Belting, Inc
Agricultural
And
Industrial
Belting
Proudly
Distributed by
AGPARTS WAREHOUSE
PH: (08) 9250 2558
12 Runyon Rd Midvale
WESTERN AUSTRALIA 6056
|
Havest Draper
& Pickup Belts
Hay Equipment
The Company was founded in 1954 and was most recently known as the agricultural
belting division of Wahpeton (USA) Canvas Co., Inc.
2004 will mark 50 years
WCCO Belting, Inc. offers a full line of agricultural belting and canvas
products. All products meet or exceed the original equipment manufacturer's
sizes and specifications.
WCCO offers the absolute best quality to keep the user in the field during
the critical harvest season.
Rub-R-Cleat™
Swather Belting.
 |
 |
Original Equipment
Sizes & Specifications
from every major agricultural equipment manufacturer. WCCO supplies over
90 percent of all swather canvases put on new machines “at the factory”.
The confidence in WCCO workmanship shown by all manufacturers is a direct
result of WCCO’s efforts to maintain product dimensions and standards
for every model. As a result, our canvases meet all the demands of today’s
modern farm machinery.
Only the best materials
are used for WCCO swather canvas products. The carefully developed synthetic
fabrics and compounds used by WCCO provide excellent environmental tolerance
while withstanding highly abrasive conditions. Both are critical to reducing
maintenance and costly downtime. In addition, the fabrics are "reverse
twisted" to ensure the best tracking characteristics.
Unsurpassed Quality
keeps you in the field during the critical haying and harvesting seasons.
Prior to shipment, each canvas produced by WCCO is inspected to assure
compliance with strict quality standards. Ours is an ISO-9001 Quality
Certified facility.
Most Durable by design.
All rubber cleats on WCCO’s Rub-R-Cleat™ canvases are vulcanized
under heat and pressure to become an integral part of the finished belt.
The edges of the belts are subject to heavy stress and are double reinforced
to extend the life of the canvas. The belts are also reinforced with a
double strip in the center. Our standard cured rubberized fabric will
significantly outlast conventional canvases.
State-Of-The-Art Design
ensures you that you’ll receive only the best swather canvas. WCCO
is committed to being the industry’s engineering leader. We provide
fiberglass reinforcement rods in all Rub-R Cleat™ canvases. The rods
are shaped to provide enhanced rigidity without sharp edges that can increase
"wear" in high stress areas. In addition, our Econo-Cleat™
Wood and Poly slat models have more staples and rivets per cleat, which
reduces stalk and weed pick up.
Most Reliable construction.
What makes WCCO canvases durable also makes them reliable. Impregnated
rubber cleats, vulcanized rubber-coated fabrics, Fiberglas reinforced
rods, materials that won’t shrink, rot, or mildew, poly cleats and
reinforced edges all keep WCCO products running longer.
Economical to own.
When considering the superior materials, quality workmanship and state-of-the-art
designs, your best values are WCCO swather canvases.
Our Research and Development Continues
to provide space-age materials to reduce the weight of our belts, the
power required to drive the belts and increase strength and life of the
belts at the same time.
Combine Pickup &
Harvest
Header Belts
Rubberized Belting
With Or Without
Harvesting Teeth
 |
 |
Original Equipment Sizes & Specifications
from every major agricultural equipment manufacturer. The confidence
in WCCO workmanship shown by all manufacturers is accomplished because
of WCCO’s efforts to maintain product dimensions and standards
for every model. As a result, our belts and teeth meet all the demands
of today’s modern harvesting equipment.
Materials used for WCCO combine pickup belts and teeth.
The unique fabrics and components used by WCCO provide excellent environmental
resistance while withstanding highly abrasive conditions. Both are critical
to reducing maintenance and costly downtime.
Unsurpassed Quality
keeps you in the field during the critical harvesting season. Prior
to shipment, each pickup belt produced by WCCO is hand inspected to
assure compliance with strict quality standards.
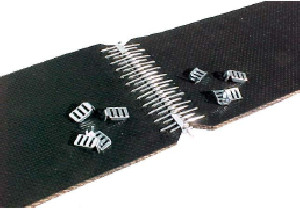
Most Durable by design.
All WCCO combine pickup fabrics are rubber vulcanized under extreme
heat and pressure. Our standard two-ply rubberized fabric, with a specially
designed
angled lacing, is engineered for optimum tracking and excellent dimensional
retention.
State-Of-The-Art Design
ensures that you’ll receive only the best combine pickup belts
and teeth. WCCO is committed to being the industry’s engineering
leader, and WCCO innovation now brings you a combine pickup belt with
a “double prong” tooth design. The WCCO tooth contains a special
plastic compound specifically designed to withstand even the roughest
field conditions. The unique flex construction of the teeth, along with
the most efficient angle of pickup, puts the WCCO combine pickup belts
ahead of any other pickup available today.
Most Reliable construction.
What makes WCCO pick-up belts durable also makes them reliable. Vulcanized
rubbercoated fabrics, “double prong” pickup teeth, and materials
that won’t shrink, rot, or mildew all keep WCCO pickup belts running
longer.
Economical to own.
When considering the superior materials, quality workmanship and state-of-the-art
designs, your best values are WCCO combine pickup products.
Swather Belt Installation
Please Read
A few minutes of your time can prevent premature belt failure
and costly down time.
Preparation –
Before
1. Check all bearings for movement without drag or noise. Lubricate
or replace as required.
2. Check for bent or broken rollers and replace as required.
Free all rollers of rust and foreign material buildup.
3. Eliminate catch points, weld splatters and sharp metal edges.
Maintenance –
After
1. Drapers should be REMOVED when the machine is not to be used,
or if it is exposed to weather for an EXTENDED period of time. Roller
rust and deterioration caused by decaying materials, accelerated by
wet conditions, can result in premature belt failure.
2. Store drapers in a protected, dry place.
3. On swathers using two belts of equal size, ALTERNATE belts
PERIODICALLY to even wear and extend belt life.
4. Before re-installing belt for the next season, EXAMINE fastener
bar connectors closely. REPLACE bent or broken connectors immediately
to prevent belt damage.
5. Remember WCCO Swather/Windrower Belts are specially designed
for this application. Special materials and quality craftsmanship make
WCCO Belts excellent replacement products, that meet or exceed O.E.M.
requirement
Installation
1. You can operate your WCCO Swather Belt in either direction.
However, install the HEADS of the connector bolts so they are facing
the direction most frequently operated.
2. Remove excess material on the flap. To prevent noisy slapping
effect during operation, trim tail end flaps to ¼ inch after
fastener bar has been tightened.
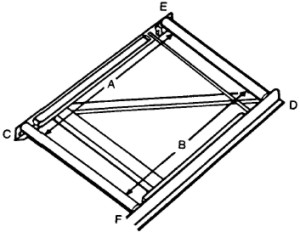
3. Belts will tend to creep toward the slack side of the roller.
If distance “A” is less than distance “B”, then
the belt will tend to run toward the high side of the roller carriage.
If distance “A” is greater than “B”, then the belt
will run toward the low side of the roller carriage.
4. When adjusting the roller carriage, always keep the rollers
parallel with each other. For best results, measure roller ends diagonally
across roller carriage making sure the distance from points “C”
to “D” is EQUAL with he distance from points “E”
to “F”.
Baler and Industrial
Conveyor Belting
2 or 3 Ply.
 |
- 2 & 3 ply
Baler Belting
- Cut-To-Length
- Bulk Roll |
olls
Original Equipment Sizes & Specifications from every major agricultural
equipment manufacturer.
The confidence in WCCO workmanship shown by all manufacturers exists
because of WCCO’s efforts to maintain product dimensions and standards
for every
model. As a result, our belts meet all the demands of today’s modern
farm machinery. Materials used for WCCO baler belt products. The unique
fabrics and
compounds used by WCCO provide excellent environmental resistance while
withstanding highly abrasive conditions. Both are critical to reducing
maintenance and costly downtime.
Unsurpassed Quality keeps you in the field during the critical haying
season.
Prior to shipment, each belt produced by WCCO is hand inspected to assure
compliance with strict quality standards.
Most Durable by design.
All special textures on WCCO’s baler belt models are vulcanized
under heat and pressure to become an integral part of the finished belt.
That is essential in order to withstand the extreme flexing which is
common on large round balers. Our standard two- or three-ply rubberized
fabric, with a specially designed rectangular-angled lacing, is engineered
for optimum tracking and excellent dimensional retention.
State-Of-The-Art Design ensures you that you’ll receive only the
best baler belts.
WCCO is committed to being the industry’s engineering leader, and
our latest technological advancement gives you a full line of belting
textures, which all meet manufacturers’ specifications. Those textures
are mandatory to ensure proper operation of the various balers in the
market today. WCCO offers Rough Top Herringbone, Mini-Rough Top, Texture
Top, Diamond Top, Continuous Chevron, plus more. Don’t cut yourself
short by putting a belt on your machine that’s not designed for
maximum productivity.
Most Reliable construction.
What makes WCCO baler belts durable also makes them reliable. Impregnated
rubber patterns, vulcanized rubber-coated fabrics, and materials that
won’t stretch, shrink, rot, or mildew all keep WCCO baler products
running longer.
Economical to own.
When considering the superior materials, quality workmanship and state-of-the-art
designs, your best values are WCCO baler belt products.
- Endless Baler Belting
- Cut-To-Length
- Bulk Rolls
Round
Baler Belt Installation
PLEASE READ
A few minutes of your time can prevent premature belt failure
and costly down time.
Preparation – Before
1. Always use the same ply construction for all belts. Two-ply
and three-ply constructions do not react in the same manner under tension.
Use of different ply constructions will create an unequal load situation
and the baler will not perform properly.
2. Check all bearings for movement without drag or noise. Lubricate
or replace as required.
3. Check for bent or broken rollers and replace as required.
Free all rollers of rust and foreign material buildup.
4. Eliminate catch points, weld splatters and sharp metal edges.
5. Replace all worn belts at the same time.
6. Resize all belts, new and old, to equal lengths for maximum
load distribution.
(NOTE: Resize all belts between
each baling season.)
Maintenance – After
1. Take up roller adjustment to recommended tension. (Important:
Check your baler’s operating manual for proper tension adjustment.
NOTE: It is especially important
to leave the recommended slack in the belts on Vicon, McKee, New Idea
and corresponding Case IH models. A belt adjusted too tight will have
a shorter service life.)
2. Check your belts, belt lacing and pin occasionally during
use. Make repairs or replacements as required. (Note:
The lacing and connecting pin are your belts’ weakest points. Proper
maintenance is critical to your baler’s overall performance.)
3. Resize all belts and replace as necessary between baling seasons.
Check your baler thoroughly before starting your next baling season.
4. Remember, WCCO Baler Belts are specially designed for large
round balers. Special materials and quality craftsmanship make WCCO
Baler Belts excellent replacement products that meet or exceed O.E.M.
requirement.
Installation - Upper Belts
1. Install belt following “Direction Of Travel” arrow.
(End with 45 degree corners and the least number of hooks is the trailing
end. End with square-cut corners is the leading end.)

2. After threading a belt through the machine, pull ends together.
Insert connecting pin through the lacing hooks making sure the hooks
on both end alternate. (Leading end should have hooks on both outside
edges.)
3. After inserting the connecting pin completely, bend approximately
¼ inch of the straight end at a 90 degree angle to match the
other end.
Installation - Lower Platform Aprons
1. Clean V-guide slot on pulleys. (Note: International Harvester
models do not have V-guides.)
2. [Follow steps 1& 2 from Upper Belts instructions above.]
3. If Clipper Lacing is used, insert leader wire attached to
cable, through hooks. Do not jerk on leader wire or it will come off.
After cable is in place, remove leader wire, attach retaining nut and
crimp it. If Minet Lacing is used, install pin and bend approximately
¼ inch of straight end at a 90 degree angle.
4. Run baler momentarily to check for proper tracking, adjust
as necessary.
NOTE: Belts which are all replaced
as a set, will generally fit better and last longer.
Endless Baler Belt Installation
Tip:
After installing the new belts, decrease the belt tension to about 60%
to 70% of the normal baling tension and run the PTO slow (less than half
normal speed). Watch the belts for tracking so they don't run up against
any belt guides. This will probably take some roller adjustments on the
baler. Adjust the rollers according to the Baler Owners Manual. Slowly
increase the PTO speed while watching the belts for tracking. Slowly increase
the belt tension to no more than 75% of normal baling tension. If the
belts are running proper, you can go to the field for baling. Start baling
at a reduced throttle speed to insure proper installation and tracking
of the new belts. Do not increase the belt tension for increased bale
density until you have ran at least 25 bales. This will allow the belts
to break in and conform to your baler. Continue to monitor your belts
daily and make adjustments when necessary.
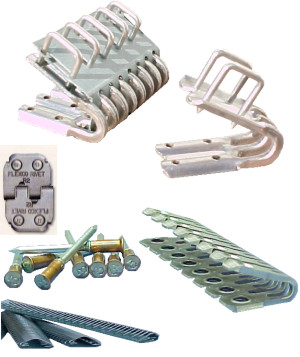
Belt Lacing and Tools.
 |
 |
 |
|
Agparts stock
Clipper vice lacer 7" and 10" tools for easy in-field
service.Titan and Mato vice lacer tools available as well.
|
Various baler
belts use different fasteners for the splice. Note that different
O.E.M.’s have different specifications. Agparts keep a comprehensive
range of Clipper, Titan Goro and Mato joiners and joiner wires.
|
Smartlocks are
a great way to protect the joiner ends from pulling out. Easy
to install with Clipper type joiners.
|
Field
Service Guide for Belting
TRACKING PROBLEMS
Belt runs to one side along given
point on machine.
1. Idler or idlers that immediately precede trouble point are
not at right angles to longitudinal axis of Advance the end of the idler
to which the belt has shifted in the direction of belt travel. Check
for belt end squareness to belt centerline.
2. Frozen and sticking idlers Lubrication poor, improve general
maintenance.
3. Frame of conveyor crooked or idler stand not centered.Determine
extent of misalignment, then square.
4. Material building up on idlers. Check installation of scrapers,
or other cleaning devices. Improve general maintenance.
A single section of the belt tends
to run to one side along the machine.
1. Crooked splice. Belt needs re-splicing with ends squared with
belt centerline.
2. Crooked end of belt at fasteners, or fasteners not joined
squarely. Belt should be re-spliced, if possible, using new fasteners.
3. Bow in belt. New belt may straighten out as it becomes broken
in.
Wandering Belt
1. Belt too heavy or stiff for drive rollers. Replace with a
more flexible belt.
2. Poor loading or off-center loading. Change loading procedures.
WEARING PROBLEMS
Damaging wear on drive roller side
of belt.
1. Drive roller is slipping. Increase take-up, lag drive or increase
arc of contact on drive roller with snubber oil.
2. Loading end of belt has buildup of material which is being
ground between belt and drive roller. Improve belt loading procedures.
Install plows or scrapers in front of drive roller on return run. If
leakage through fasteners, use belt with flap or vulcanized splice.
3. Idlers are sticking. Increase maintenance and lubrication.
4. bolt heads protruding above lagging. Replace worn lagging
on pulley. Tighten bolts. Cement lagging to pulley.
Excessive edge wear.
1. Folding of belt edge on edge guard or frame. Consider using more
stable construction. Provide more clearance. Smooth any rough areas
on
2. Side loading. Load in direction of belt travel.
3. Buildup of material on drive roller. Install scrapers to eliminate
buildup from pushing belt against frame.
Top Cover Wear
1. Return idlers dirty, frozen or misaligned. Clean belt; clean
and lubricate idlers .. Improve maintenance. May need cleaning device
installed. Check alignment of return idlers.
2. Poor loading conditions. Correct to feed onto center of belt
in same direction as belt runs. Material falling down from delivery
chute should be at about same speed as conveyor belt.
3. Sags in belt letting load shift as it passes over idlers.
Increase belt tension and/or reduce idler spacing.
Top cover grooved and gouged.
1. Skirt boards are pressing against belt. Skirt boards are too
hard. Redesign skirt board to permit material to work out, not in. Change
to softer material for skirt board. Do not use reinforced rubber for
skirt boards.
2. Space between belt and skirt seals is too great. Adjust to
minimum clearance and angle to belt to allow material to work itself
out.
3. Material jammed at chute. Redesign chute.
4. Metal side of chute or skirts too close to belt. Adjust so
gap between metal and belt increases in direction of travel to avoid
jamming.
BREAKING
PROBLEMS
Breaks in belt parallel to belt edge
or star breaks in belts.
1 Heavy lumps falling on belt or falling from too great a height. Reduce
impact of material by redesigning loading area.
2 Material lodged between belt and pulley or stuck to back. Return run
should have scrapers ahead of tail pulley. Check loading design to reduce
material
Breaks in belt parallel to belt edge or star breaks in belts.
Belt fasteners too large for drive roller size being used. Replace with
manufacturer's recommended fasteners.
Transverse breaks at belt edge.
1. Folding up of belt edges. Improve tracking. Increase lateral
clearance. Redesign of belt construction may be required.
2. Belt is mildewed. Use belt with polyester or nylon fabrics
and mildew inhibitor in rubber compounds. All WCCO belting have synthetic
fabrics and contain mildew inhibitors.
3. Idler next to drive roller is located too high. Reposition
final idler in line with drive roller and previous idler.
Fasteners pulling out, tearing belt.
1. Fasteners wrong size or not tight. Replace fasteners and inspect
regularly. Consider fasteners with longer reach.
2. Belt too tight. Correct belt tension.
Fasteners let go.
1. Fasteners not clinched tightly. Replace fasteners and clinch
tightly.
2. Fasteners wrong size. Replace with proper size fasteners.
3. Fasteners too weak. Replace with higher strength fasteners.
Fasteners on edge pull through belt.
1. Fasteners too close to edge. Check fastener to edge distance,
leave 1/4 inch between last fastener and belt edge.
2. Pin improperly installed. Replace pin.
STRETCHING AND SHRINKING
PROBLEMS
Stretching
1. Belt too tight. Reduce take-up tension.
2. Belt not heavy enough for desired application. Switch to a
higher grade belt.
3. Frozen idlers or buildup of material on drive rollers and
idlers. Improve maintenance and clean-up. Lube or replace frozen idlers.
Shrinking
1. Bad edge on belt due to rubbing. Improve alignment of idlers,
drive rollers and tracking of belt. Consider narrower belt.
2. Damage by abrasives, chemicals, mildew, acid heat and oil.
Specify belt with proper resistance for material being handled. Check
maintenance procedures.
3. Improper adhesion.
Cracking covers
1. Abrasion, chemical, acid or rot damage. Specify belt with
proper rubber compounds for material being handled.
2. Belt too tight. East tension on belt and use some type of
compensating take-up. Consider lagging drive and using snub oil.
|
|